简介:MySQL各版本差异;单机,集群安装;8.x试用;灾备处理;Sharding-JDBC的主从配置,分库分表,及在分库分表情况下支撑的SQL
MySQL版本
版本类型
MySQL Community Server 是开源免费的,这也是我们通常用的MySQL的版本
- MySQL Community Server 社区版本,开源免费,但不提供官方技术支持。
- MySQL Enterprise Edition 企业版本,需付费,可以试用30天。
- MySQL Cluster 集群版,开源免费。可将几个MySQL Server封装成一个Server。
- MySQL Cluster CGE 高级集群版,需付费。
- MySQL Workbench(GUI TOOL)一款专为MySQL设计的ER/数据库建模工具。它是著名的数据库设计工具DBDesigner4的继任者。MySQL Workbench又分为两个版本,分别是社区版(MySQL Workbench OSS)、商用版(MySQL Workbench SE)。
我们选择Generally Available(GA)Release 去下载。GA 是指软件的通用版本,一般指正式发布的版本。
版本的差异对比
MySQL 5.5 特性
2010年,MySQL 5.5发布
- 默认存储引擎的改变,从默认的MyISAM 到 INNODB。
- 多核扩展,能更充分地使用多核CPU。
- 行级锁(一致性的非锁定读 MVCC)
- 原InnoDB只有一个UndoSegment,最多支持1023的并发;现在有128个Segments,支持128K个并发(同样,解决高并发带来的事务回滚)。
- Linux上实现异步IO
总结而言,5.5 版本较5.1性能有一个很大的提高
MySQL 5.6 特性
2013年,MySQL 5.6发布
- 表空间增长大小:innodb_autoextend_increment
- 是否独享表空间:innodb_file_per_table
- 支持全文索引
- 支持online DDL create,alter,drop
- undo log可独立出系统表空间
- redo log最大可增长到512G
总结而言,MySQL 5.6是MySQL历史上一个里程碑式的版本
MySQL 5.7 特性
2015年,MySQL 5.7发布
- 安全性 用户表 mysql.user 的 plugin字段不允许为空, 默认值是 mysql_native_password,而不是 mysql_old_password,不再支持旧密码格式
- MySQL数据库从5.7.8版本开始,也提供了对JSON的支持
- 临时表的性能改进
- 复制性能的改进 (支持多线程复制(Multi-Threaded Slaves, 简称MTS)
- 支持多源复制(Multi-source replication)
MySQL 8.0 特性
2018年,MySQL 8.0发布
- 整合了存储有关数据库对象信息的事务数据字典,所有的元数据都用InnoDB引擎进行存储
- innodb 增强
- MySQL 8.0 更好支持文档型数据库和JSON
- MySQL 8.0 版本开始支持期待已久直方图
- 窗口函数(Window Functions)
- 隐藏索引,降序索引
- 从 MySQL 8 开始,使用 utf8mb4 作为 MySQL 的默认字符集
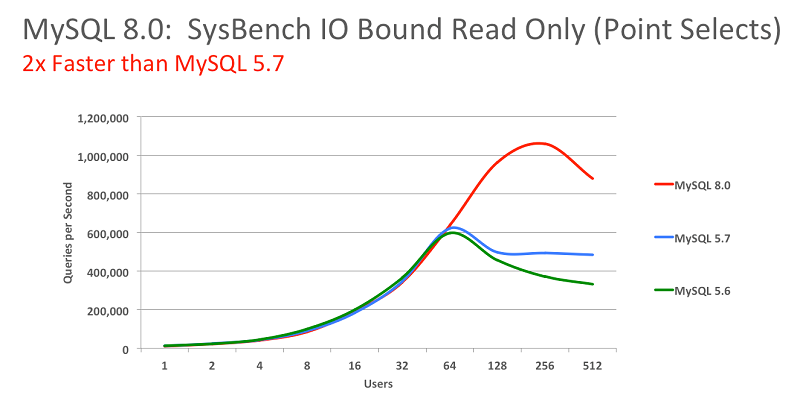
总结而言,官方表示 MySQL 8 要比 MySQL 5.7 快 2 倍,还带来了大量的改进和更快的性能!

MySQL 8.0 不兼容问题
MySQL 8.0对关键字的处理做了进一步严格约束,这在MySQL5.7是没有的,或者约束较少,一个叫 “admin”的表,不能在8.0版本中声明
创建用户和授权
1
2
3
4
5
6
7
8
9
10
11
12
#先创建一个用户
create user 'hong'@'%' identified by '123123';
#再进行授权
grant all privileges on *.* to 'hong'@'%' with grant option;
#如果还是用原来5.7的那种方式
grant all privileges on *.* to 'hong'@'%' identified by '123123';
#会报错误:
ERROR 1064 (42000): You have an error in your SQL syntax; check the manual that corresponds to
your MySQL server version for the right syntax to use near 'identified by '123123'' at line 1远程登录
1
2
3
4
5
6
7
select host,user,authentication_string,plugin from user;
update user set host='%' where user='root';
flush privileges;
# 还不行 因为 8.0 之前的版本中加密规则是mysql_native_password,而在mysql8之后,加密规则是caching_sha2_password
ALTER USER 'root'@'%' IDENTIFIED BY 'password' PASSWORD EXPIRE NEVER; #修改加密规则
ALTER USER 'root'@'%' IDENTIFIED WITH mysql_native_password BY 'password'; #更新一下用户的密码
FLUSH PRIVILEGES; #刷新权限Java 驱动改动
1 | #5.7 |
- 数据库连接地址一定要显示指定SSL验证为false(如果有验证就指定为true),MYSQL8.0默认SSL使用验证:useSSL=false;时区指定
1 | jdbc_url=jdbc:mysql://localhost:3306/xxxx?characterEncoding=UTF-8&serverTimezone=UTC&useSSL=false |
MySQL 单机安装
MySQL 5.7,Centos 6.5 安装
1 | # 判断系统 |
MySQL 集群安装
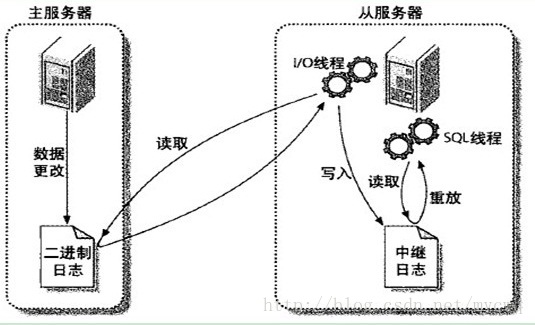
主从复制
主服务器数据库的每次操作都会记录在其二进制文件 mysql-binlog.xxx(该文件可以在mysql目录下的data目录中看到)中,从服务器的I/O线程使用专用账号登录到主服务器中读取该二进制文件,并将文件内容写入到自己本地的中继日志relay-log文件中,然后从服务器的SQL线程会根据中继日志中的内容执行SQL语句
MySQL主从同步的作用
- 可以作为备份机制,相当于热备份
- 可以用来做读写分离,均衡数据库负载
master 配置
1
2
3
4
5
6
7
8
9
10
11
12
13
14
15
16
17
18
19
20
21
22
23
24
25
26
27
28
29
30
31
32
33### 1 my.cnf 配置 [mysqld] 下增加###
#主从配置-master
server-id=1
#log-bin 名称
log-bin=/var/lib/mysql/mysql-binlog
#设置MySQL不控制binlog的刷新,由文件系统自己控制它的缓存的刷新。这时候的性能是最好的,但是风险也是最大的
#因为一旦系统Crash,在binlog_cache中的所有binlog信息都会被丢失
sync_binlog=0
#设置日志过期天数
expire_logs_days=3
#设置binlog日志大小
binlog_cache_size=1M
### 2 在master 服务上创建账号 ###
mysql> create user 'repl'@'192.168.253.%' identified by '123456';
mysql> GRANT REPLICATION SLAVE ON *.* TO 'repl'@'192.168.253.%';
### 3 master 服务常用命令 ###
show master status;
# 查看当前 bin-log 名字与pos
show slave hosts;
# 查看从服务器列表
show binary logs;
# 获取binlog文件列表
SHOW PROCESSLIST;
# 如果有 SUPER 权限,则可以看到全部的线程,否则,只能看到自己发起的线程(这是指,当前对应的 MySQL 帐户运行的线程)
# 其中有一个Binlog Dump 线程 是slave 连接过来的
select host,user from mysql.user;slave 配置
1 | ### 1 my.cnf 配置 [mysqld] 下增加### |
主从复制说明
MySQL主从复制大体有3种方式
异步复制:在主节点写入日志即返回成功,默认情况下MySQL5.5/5.6/5.7和mariaDB10.0/10.1的复制功能是异步的。异步复制可以实现最佳的性能,主库把binlog日志发送给从库,这一动作就结束了,并不验证从库,会造成主从库数据不一致。
上文配置 即是
半同步复制:一主多从模式下,有一个从节点返回成功,即成功,不必等待多个节点全部返回。
MySQL5.5由Google贡献的补丁才开始支持半同步复制(semi Replication)模式,该模式可以确保从服务器接收完主服务器发送的binlog日志文件并写入自己的中继日志(relay log)里,然后会给主服务器一个反馈,告诉对方已经接收到完毕,这时主库线程才返回当前session告知操作完成,当出现超时情况时,源主服务器会暂时切换到异步复制模式,直到至少有一台设置为半同步复制模式的从服务器及时收到信息为止
- GTID复制模式GTID复制:(global transaction id 全局事务标识符) MySQL5.6版本开始支持
GTID复制不像传统的复制方式(异步复制、半同步复制)需要找到binlog(MASTER_LOG_FILE)和POS点(MASTER_LOG_POS),只需要知道master的IP、端口、账号、密码即可。因为复制是自动的,MySQL会通过内部机制GTID自动找点同步。
常见问题
- 主从复制延迟,可查看主库是否写压力过大,主从网络延迟,主库慢SQL多,硬件太差等
- 主从数据库用户建立技巧,主从操作数据用户相同(非Root),从库设置read_only=1
1 | 用户:developer 密码:123546 端口:3306 数据库:felicity |
数据备份问题,可选择其中一台slave(最好是不对外提供服务的数据),开启从库的binlog
备份时可以选择只停止SQL线程,停止应用SQL语句到数据库,I/O线程保留工作状态,执行命令为stop slave sql_thread;备份方式可以采取mysqldump逻辑备份或者直接物理备份,例如使用cp、tar(针对目录)工具,或xtrabackup(第三方的物理备份软件)进行备份,逻辑备份和物理备份的选择,一般是根据总的备份数据量的多少进行选择,数据库低于20G,建议选择mysqldump逻辑备份方法,安全稳定,最后把全量和binlog数据发送到备份服务器上留存
master 宕机
如果主库可以SSH连接,bin-log数据没丢,要把主库的bin-log补全到所有库
a. 提升S1为M1的操作
1
2
3
4
1. 调配置read-only,授权用户select,变成增删改查,开启binlog
2. rm -rf master.info relay-log*
3. 登录数据库reset master
4. 重启数据库,提升S1为M1完毕b. 所有从库:
1
CHANGE MASTER TO,MASTER_LOG_FILE=’mysql-bin.000001’,MASTER_LOG_POS=107
如果主库连接不上
1
2
3
1. 半同步从库提升主库,半同步数据,补全到所有从库半同步从库提升主库的操作1-a,所有从库执行同1-b
2. S1 只当做备库的方法 提升S1为主库,操作见1-a步骤,所有从库CHANGE MASTER 同1-b
3. 主库宕机实现没有指定从库为主库
读写分离
在有了主从复制的基础上,可进行读写分离,目前市面上大体有2种思路来进行解决
- 应用层,程序内容定义读写数据源,由程序直接连接读写库
- 中间件,程序和库之间架设一个中间件,由中间件来路由SQL请求,区别读写
两者各有优点,应用层处理效率更高,但耦合高,扩展麻烦,运维无法切入,中间件,耦合低,程序不需要任何改动直接接入,但是由于是中间件,性能会有所降低,单点问题等
由于数据是会增加的,单纯的讨论读写分离,不具有前瞻性,需要对分库分表进行一定的设计。所以就着重讨论Sharding-JDBC(在应用层的一个中间件)
和MyCat (代理层的一个中间件)
对于MySQL存储的设计,其实在需要自建的时候才考虑,如果不需要自建,分布式云数据库是一个不错的选择
如 数据库类型 :MySQL 5.7 存储空间 :150GB ( 本地SSD盘 ) 规格 :1 核 2G
购买时长 :1年 购买量 :1个最大连接数:600 ; IOPS:1000(同时最大查询量)
MySQL 中间件
ShardingSphere
ShardingSphere是一套开源的分布式数据库中间件解决方案组成的生态圈,它由Sharding-JDBC、Sharding-Proxy和Sharding-Sidecar(计划中)这3款相互独立的产品组成。 他们均提供标准化的数据分片、分布式事务和数据库治理功能,可适用于如Java同构、异构语言、容器、云原生等各种多样化的应用场景。ShardingSphere目前已经进入Apache孵化器
官方文档 | Git源码
Sharding-JDBC 发展版本
在加入Apache孵化器之前有3个大版本
- 1.x 关注SQL兼容性、分库分表、读写分离、分布式主键、柔性事务等分片功能
- 2.x 提供的数据治理能力,注册中心分发配置,基于Opentracing协议的APM系统观察跟踪
- 3.x 改名Sharding-Sphere,组成生态圈
Sharding-JDBC 使用
读写分离
版本(spring 4.x 内使用 3.1),注意引入的命名空间
1 | <dependency> |
Sharding-JDBC 不提供数据库的复制功能,需要自行完成(如MySQL主从复制),只需要将数据源配置成新的数据源对象即可,如在spring 4.x 中
1 | <!-- 主从配置 --> |
分库分表
分库分表 需要指定分库策略,分表策略,然后将数据源替换为新的数据源,如在spring 4.x 中
1 | <!-- 分库策略 --> |
读写分离 AND 分库分表
主从的配置,需要到sharding:data-source 下配置而不是在外部master-slave:
1 | <!-- 主从配置 --> |
分库分表下 支持的SQL
MyCat
暂无